- 解决DPlayer由直播模式切换到点播模式时的bug
- PHP Token 认证机制实现
- PHP PDO预处理条件查询
- JavaScript 默认值设置方法
- Promise 的基本使用方法
- 完整支持TRUNCATE TABLE和其他SQL语句的导入方案
- Jquery+ajax返回的数据类型为script,且含有多个变量
- PHP类使用详解
- jQuery AJAX success 回调中的返回值处理
- PHP解压缩Gzip文件方法总结
- JavaScript Promise 用法详解
- PHP PDO 导出指定表数据(导入前清空表)
- PHP 中使用 try-catch 捕获错误信息
- JavaScript数组求平均值方法总结
- MySQL 5.7 忘记 root 密码解决方法
- HTML 图片异步加载
- 用Javascript为图片img添加onclick事件
- 图解Windows Installer制作软件安装包
- 轻型数据库SQLite结合PHP的研发
- PHP之glob函数
- PHP代码优化及PHP相关问题总结
- 在没有MySQL支持的虚拟主机,在PHP中使用文本数据库
- DIY服务器硬盘RAID选用
- ISP如何在网内部署BGP路由协议
- 用PHP函数解决SQL injection
- Windows操作系统发展历史二
- 采集cz88.net免费代理的小程序
- Div+CSS:absolute与relative
- Photoshop CS3:为美女刷出亮白牙齿
- PHP CURL 发送和接收XML数据
- Fireworks打造热力四射手机广告
- 记录搜索蜘蛛爬行记录的Asp代码
详解Silverlight 2中的独立存储
Silverlight中的独立存储有以下一些特征:
1.每个基于Silverlight的应用程序都被分配了属于它自己的一部分存储空间, 但是应用程序中的程序集却是在存储空间******************享的。一个应用程序被服务器赋给了一个唯一的固定的标识值。基于Silverlight的应用程序的虚拟文件系统现在就以一个标识值的方式来访问了。这个标识值必须是一个常量,这样每次应用程序运行时才可以找到这个共享的位置。
2.独立存储的APIs 其实和其它的文件操作APIs类似,比如 File 和 Directory 这些用来访问和维护文件或文件夹的类。 它们都是基于FileStream APIs 来维护文件的内容的。
3.独立存储严格的限制了应用程序可以存储的数据的大小,目前的上限是每个应用程序为1 MB。
使用独立存储
Silverlight中的独立存储功能通过密封类IsolatedStorageFile来提供,位于命名空间System.IO.IsolatedStorag中,IsolatedStorageFile类抽象了独立存储的虚拟文件系统。创建一个 IsolatedStorageFile 类的实例,可以使用它对文件或文件夹进行列举或管理。同样还可以使用该类的 IsolatedStorageFileStream 对象来管理文件内容,它的定义大概如下所示:

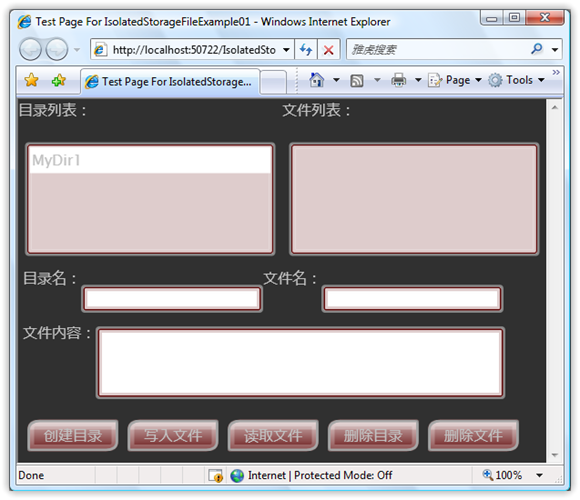
在Silverlight 2中支持两种方式的独立存储,即按应用程序存储或者按站点存储,可以分别使用GetUserStoreForApplication方法和GetUserStoreForSite方法来获取IsolatedStorageFile对象。下面看一个简单的示例,最终的效果如下图所示:
下面来看各个功能的实现:
创建目录,直接使用CreateDirectory方法就可以了,另外还可以使用DirectoryExistes方法来判断目录是否已经存在:
void btnCreateDirectory_Click(object sender, RoutedEventArgs e){ using (IsolatedStorageFile store = IsolatedStorageFile.GetUserStoreForApplication()) { String directoryName = this.txtDirectoryName.Text; if (this.lstDirectories.SelectedItem != null) { directoryName = System.IO.Path.Combine(this.lstDirectories.SelectedItem.ToString(), directoryName); } if (!store.DirectoryExists(directoryName)) { store.CreateDirectory(directoryName); HtmlPage.Window.Alert("创建目录成功!"); } }}
创建文件,通过CreateFile方法来获取一个IsolatedStorageFileStream,并将内容写入到文件中:
void btnCreateFile_Click(object sender, RoutedEventArgs e){ if (this.lstDirectories.SelectedItem == null && this.txtDirectoryName.Text == "") { HtmlPage.Window.Alert("请先选择一个目录或者输入目录名"); return; } using (IsolatedStorageFile store = IsolatedStorageFile.GetUserStoreForApplication()) { String filePath; if (this.lstDirectories.SelectedItem == null) { filePath = System.IO.Path.Combine(this.txtDirectoryName.Text, this.txtFileName.Text + ".txt"); } else { filePath = System.IO.Path.Combine(this.lstDirectories.SelectedItem.ToString(), this.txtFileName.Text + ".txt"); } IsolatedStorageFileStream fileStream = store.CreateFile(filePath); using (StreamWriter sw = new StreamWriter(fileStream)) { sw.WriteLine(this.txtFileContent.Text); } fileStream.Close(); HtmlPage.Window.Alert("写入文件成功!"); }}
读取文件,直接使用System.IO命名空间下的StreamReader:
void btnReadFile_Click(object sender, RoutedEventArgs e){ if (this.lstDirectories.SelectedItem == null || this.lstFiles.SelectedItem == null) { HtmlPage.Window.Alert("请先选择目录和文件!"); return; } using (IsolatedStorageFile store = IsolatedStorageFile.GetUserStoreForApplication()) { String filePath = System.IO.Path.Combine(this.lstDirectories.SelectedItem.ToString(), this.lstFiles.SelectedItem.ToString()); if (store.FileExists(filePath)) { StreamReader reader = new StreamReader(store.OpenFile(filePath, FileMode.Open, FileAccess.Read)); this.txtFileContent.Text = reader.ReadToEnd(); this.txtDirectoryName.Text = this.lstDirectories.SelectedItem.ToString(); this.txtFileName.Text = this.lstFiles.SelectedItem.ToString(); } }}
删除目录和文件:
void btnDeleteFile_Click(object sender, RoutedEventArgs e){ if (this.lstDirectories.SelectedItem != null && this.lstFiles.SelectedItem != null) { using (IsolatedStorageFile store = IsolatedStorageFile.GetUserStoreForApplication()) { String filePath = System.IO.Path.Combine(this.lstDirectories.SelectedItem.ToString(), this.lstFiles.SelectedItem.ToString()); store.DeleteFile(filePath); HtmlPage.Window.Alert("删除文件成功!"); } }}void btnDeleteDirectory_Click(object sender, RoutedEventArgs e){ if (this.lstDirectories.SelectedItem != null) { using (IsolatedStorageFile store = IsolatedStorageFile.GetUserStoreForApplication()) { store.DeleteDirectory(this.lstDirectories.SelectedItem.ToString()); HtmlPage.Window.Alert("删除目录成功!"); } }}
获取目录列表和文件列表:
void lstDirectories_SelectionChanged(object sender, SelectionChangedEventArgs e){ if (lstDirectories.SelectedItem != null) { using (IsolatedStorageFile store = IsolatedStorageFile.GetUserStoreForApplication()) { String[] files = store.GetFileNames( this.lstDirectories.SelectedItem.ToString() + "/"); this.lstFiles.ItemsSource = files; } }}void BindDirectories(){ using (IsolatedStorageFile store = IsolatedStorageFile.GetUserStoreForApplication()) { String[] directories = store.GetDirectoryNames("*"); this.lstDirectories.ItemsSource = directories; }}
增加配额
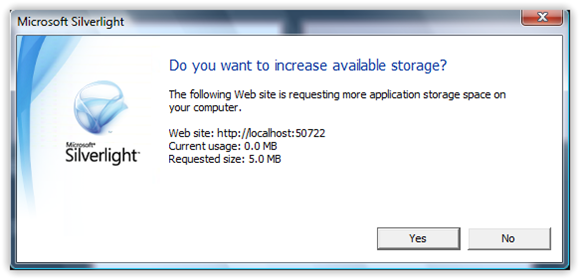
在本文一开始我就提到独立存储严格的限制了应用程序可以存储的数据的大小,但是我们可以通过IsolatedStorageFile类提供的IncreaseQuotaTo方法来申请更大的存储空间,空间的大小是用字节作为单位来表示的,如下代码片段所示,申请独立存储空间增加到5M:
using (IsolatedStorageFile store = IsolatedStorageFile.GetUserStoreForApplication()){ long newQuetaSize = 5242880; long curAvail = store.AvailableFreeSpace; if (curAvail < newQuetaSize) { store.IncreaseQuotaTo(newQuetaSize); }}
当我们试图增加空间大小时浏览器将会弹出一个确认对话框,供我们确认是否允许增加独立存储的空间大小
文件被存往何处
既然独立独立存储是存放在客户端本地,那到底存放在何处呢?在我个人计算机上的地址为:C:\Users\TerryLee\AppData\LocalLow\Microsoft\Silverlight\is\035kq51b.2q4\pksdhgue.3rx\1,不同机器会有一些变化,另外在XP下的存储位置与Vista是不相同的。在g文件夹下面,我们找到当前应用程序的一些公有信息,可以看到有如下三个文件:
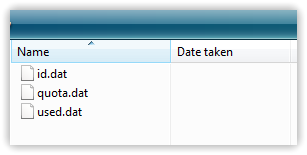
id.dat记录了当前应用程序的ID
quota.dat记录了当前应用程序独立存储的配额,即存储空间大小
used.dat记录已经使用的空间
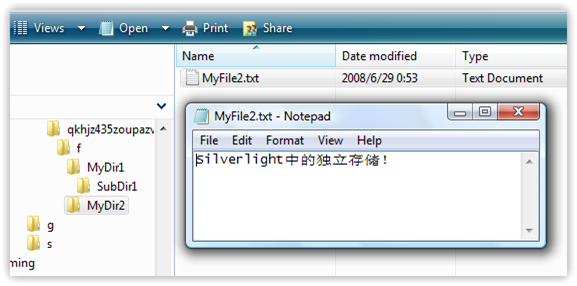
在另一个s文件夹下可以找到我们创建的目录以及文件,并且可以打开文件来看到存储的内容,如下图所示:
禁用独立存储
现在我们来思考一个问题,既然独立存储是一个与Cookie机制类似的局部信任机制,我们是否也可以禁用独立存储呢?答案自然是肯定的。在Silverlight应用程序上点击右键时,选择Silverlight Configuration菜单,将会看到如下窗口:
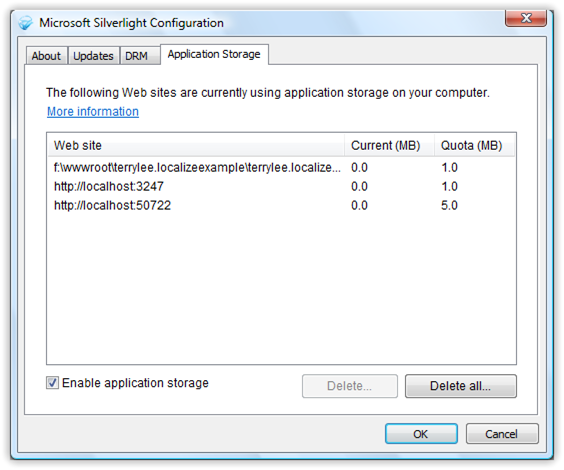
在这里我们可以看到每一个应用程序存储空间的大小以及当前使用的空间;可以删除应用程序独立存储数据或者禁用独立存储的功能。
独立存储配置
最后在简单说一下独立存储配置,在Beta 1时代是应用程序配置,现在不仅支持应用程序配置,同时还支持站点配置,我们可以用它来存储应用程序配置如每个页面显示的图片数量,页面布局自定义配置等等,使用IsolatedStorageSettings类来实现,该类在设计时使用了字典来存储名-值对,它的使用相当简单:
IsolatedStorageSettings appSettings = IsolatedStorageSettings.ApplicationSettings;appSettings.Add("mykey","myValue");appSettings.Save();IsolatedStorageSettings siteSettings = IsolatedStorageSettings.SiteSettings;siteSettings.Add("mykey1","myValue1");siteSettings.Save();
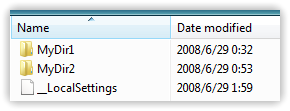
独立存储配置的机制与我们上面讲的一样,它也是基于本地文件存储,系统默认的会创建一个名为__LocalSettings的文件进行存储,如下图所示:
打开文件后可以看到,存储的内容(此处进行了整理)
<ArrayOfKeyValueOfstringanyType xmlns:i="http://www.w3.org/2001/XMLSchema-instance" xmlns="http://schemas.microsoft.com/2003/10/Serialization/Arrays"> <KeyValueOfstringanyType> <Key>mykeyKey> <Value xmlns:d3p1="http://www.w3.org/2001/XMLSchema" i:type="d3p1:string">myValueValue> KeyValueOfstringanyType>ArrayOfKeyValueOfstringanyType>
值得一提的是使用独立存储配置不仅仅可以存储简单类型的数据,也可以存储我们自定义类型的数据。
小结
本文详细介绍了Silverlight 2中的独立存储机制,希望对大家有所帮助。